
License Plate Recognition Using Raspberry Pi and OpenCV (Codes Included)
License plate recognition is an application of computer vision technology that involves the detection and recognition of license plates on vehicles. This technology is useful in various industries, including law enforcement, traffic management, and parking management.
In recent years, there has been an increase in the use of low-cost single-board computers like Raspberry Pi in developing license plate recognition systems. This article aims to guide you on how to develop a license plate recognition system using Raspberry Pi, OpenCV, and pytesseract.
Materials Required:
- Raspberry Pi 3 Model B or higher
- Micro SD card (16 GB or higher)
- USB camera module
- Power supply
- HDMI cable
- Keyboard and mouse
- Internet connection
Step 1: Set Up Raspberry Pi The first step is to set up your Raspberry Pi. To do this, download the latest version of the Raspberry Pi operating system from the official website and flash it onto your micro SD card using a software like balenaEtcher. Insert the micro SD card into the Raspberry Pi and connect it to a power supply, keyboard, mouse, and monitor using an HDMI cable. Boot up the Raspberry Pi and connect it to the internet.
Step 2: Install Required Libraries The next step is to install the required libraries for the license plate recognition system. Open the terminal on the Raspberry Pi and enter the following commands:
These commands will update and upgrade the Raspberry Pi operating system and install the required libraries, including OpenCV and pytesseract.
Step 3: Capture Image from USB Camera Connect the USB camera module to the Raspberry Pi and capture an image of a vehicle with a visible license plate. To capture an image using OpenCV, open the Python IDE on the Raspberry Pi and enter the following code:
This code captures an image using the USB camera module and saves it as "image.jpg". The captured image will be used for license plate recognition.
Step 4: Perform License Plate Recognition using pytesseract The next step is to perform license plate recognition using pytesseract. Open the Python IDE on the Raspberry Pi and enter the following code:
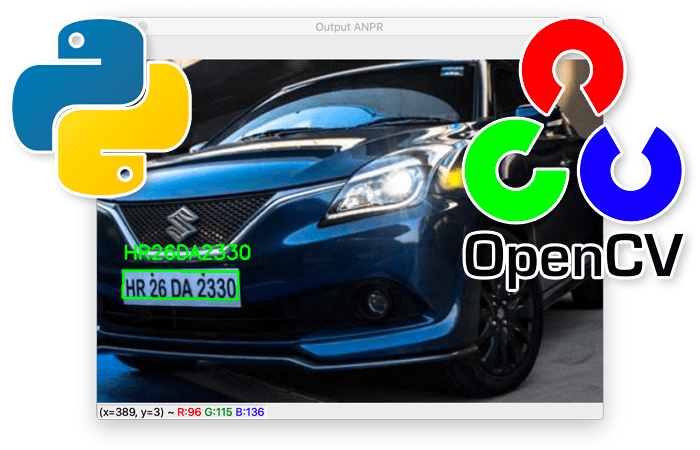
This code reads the captured image using OpenCV, converts it to grayscale, and performs thresholding to enhance the license plate's edges. It then uses pytesseract to extract the license plate number from the image. The extracted license plate number is printed on the screen.
Step 5: Display License Plate Recognition Result To display the license plate recognition result, open the Python IDE on the Raspberry Pi and enter the following code:
This code reads the captured image using OpenCV, converts it to grayscale, and performs thresholding to enhance the license plate's edges. It then uses pytesseract to extract the license plate number from the image. The extracted license plate number is displayed on the image using the cv2.putText() function. The license plate recognition result is displayed on the screen using the cv2.imshow() function.
Here is the full code:
Step 6: Conclusion
In this article, we have demonstrated how to develop a license plate recognition system using Raspberry Pi, OpenCV, and pytesseract. The system can be used for various applications, including law enforcement, traffic management, and parking management. The license plate recognition system can be further improved by incorporating machine learning algorithms for better accuracy and efficiency.
No comments: